Congratulations on your new X-ride CarPlay / Android Auto interactive screen for motorcycles.
Learn to operate X-ride before you use it when riding, for your own and your fellow commuters safety. This manual covers several X-ride models why spechs and description can vary depending on model.
- Please read these instructions before you use your X-ride.
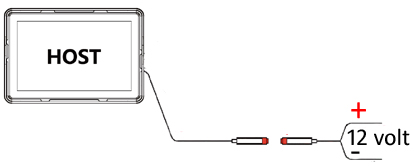
- This device has to be wired to 12 volts. It has no power switch which means it turns on when the power is connected. Connect it to your existing wiring so that it turns on with the ignition, or put in a switch on the wiring to the X-ride if connected directly to the battery.
- Disconnect the wires from your battery when installing the X-ride wiring.
- Plan the placement of the X-ride before you cut the wiring.
- Do not use a high compressed water jet directly on the X-ride or sink it in water.
- This is a guide and the technology are constantly improving why images from this manual can differ to the device.
- This product are for motorcycles, ATV and Scooters.
- Video playing and web browsers are not supported on this device. In some countries it is prohibited by law, and a direct danger to traffic safety.
- The navigational and other functions in this device is only a help when driving. This doesn’t mean that you can’t be distracted, reckless or loose you judgment when riding. Accidents related to X-ride usage cannot held liable to X-MC Parts ApS or X-ride dealers.
Installations guide
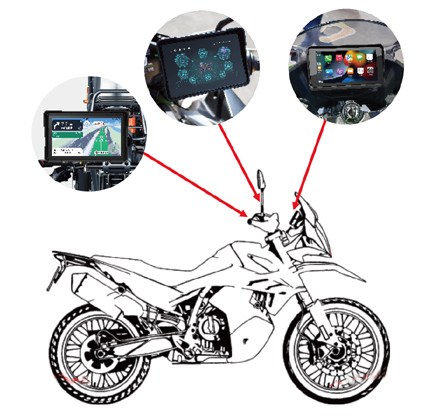
There are 3 ways that you can mount the X-ride:
- Handlebar
- Crossbar
- Mirror
Product list
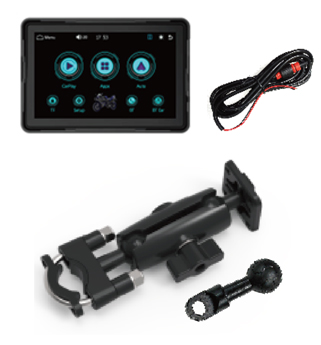
- X-ride screen
- Power extension cable with plug. Black – / red + / (X-ride 6.2 Yellow (antenna) control +)
- RAM mount with clamp for handlebar / crossbar
- Ball head bracket for mirror mount.
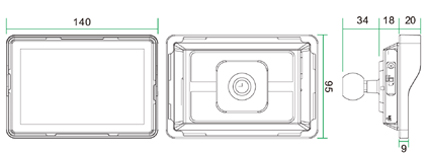
Product size in mm.
Interfaces

- Microphone
- TF (Memory) card: Remove the screws, and you can see the TF port.
- N/A
- Microphone
- Power cord (and DVR cords for models with dual video camera)
Wiring diagram
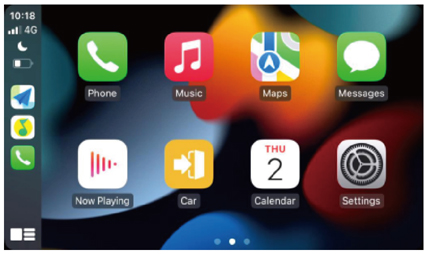
Main menu
When the X-ride is turned on and the welcome video is finished playing, a PIN code interface apears on the screen. The PIN code is by default 0000, click “Yes” after the four zeros.

- Home/ Main menu
- Current status
- N/A
- Volume
- Clock
- Brightness
- Return to menu
Main interface and application
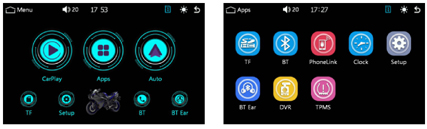
- This device has multble screens. Click on the center “Apps” icon on the main interface to enter the Application interface.
- Click on the (1) “Home” icon to enter the main interface, or click on the (7) icon to go back to the previous interface.
- Click on the (5) “Clock” application on the main interface to enter the time settings.
- Click on (4) “Volume” icon to enter the volume settings.
- Click on (6) “Brightness” icon to enter the brightness settings. You can choose between 3 settings: Day-, Night mode & Screen off.
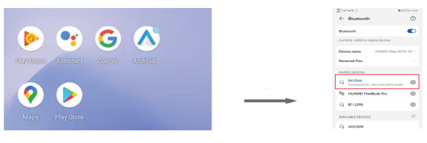
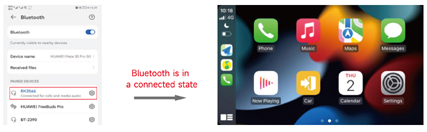
android auto
Click on the icon “BT” on the X-ride and goto Ensure that the Bluetooth are enabled and go to the Bluetooth settings on your phone and find the device CAR-BT_xxxx. Pair the devices.
The use of Android Auto requires the phone to support Google services, install the following essential software Android Auto in the Google Play Store if not preinstalled, and ensure that the Bluetooth is turned on, on your phone.
Click on the “Auto” icon to enter the Android Auto application.
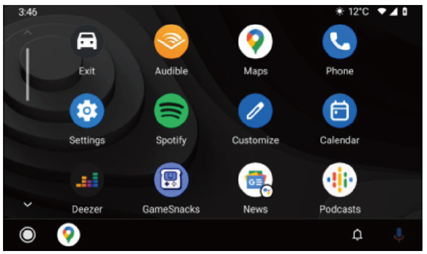
- Click on “Settings” and the settings panel will automatically pop up on the mobile interface.
- Click on “Maps” to open Google Maps.
- Click on “Phone” to make a call.
- Click on “Exit” to return to the system interface.
After installing the above application click on Android Auto and follow the prompts to install the corresponding services and updates. If it can be opened normally, it indicates the the software environment support is successful.
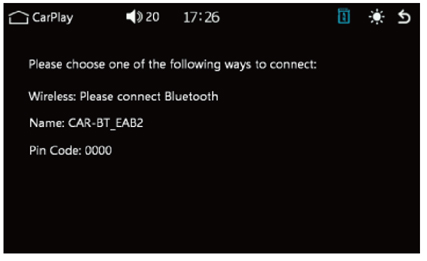
Carplay
Click on “Carplay” icon to enter the application interface and connect your phone and X-ride according to the prompts and personal needs.
Correct steps for CarPlay wireless connection:
CarPlay wirelessly connects to iPhone, only requires Bluetooth connection, no need to manually connect to host hotspot.

After clicked on “CarPlay” to connect successfully, the interface shows the application screen, and relevant functional operations can be carried out at this time.
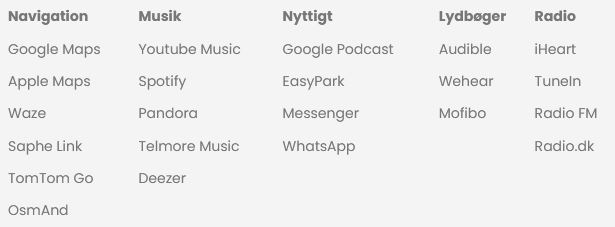
Apps
The apps that is compatible with Android Auto and CarPlay will automatically be showed at the respective interfaces. Go to your App store to explore Apps for X-ride. When seaching for Apps put in “Android Auto” in your seach term and for Apple use “CarPlay”. All compatible Apps should be listed.
NOTE: Some Apps requires subscriptions.
Here is a list of some compatible useful Apps:
TF – Memory card
From the main interface click on “Apps” and then click on the “TF” in the next screen. Here you can enter the audio and video playback interface from blayback if you have inserted a memory card with audio- and/or video files.
Supported audio/vidio file formats:
AVI, MKV, QT, ASF, FLV, RMVB, MP3, WMA, ACC, WAWE, FLAC, APE, OGG, M4A
Image supportedf formats: BMP, GIF, JEG, PNG
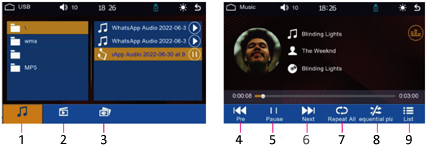
- Music
- Video
- Images
- Previous
- Pause
- Next
- Repeat
- Random
- Listing
BT (Bluetooth)
Click on the “BT” icon to enter the Bluetooth interface. After connecting the phone Bluetooth, you can perform functions susch as phone and music playback.
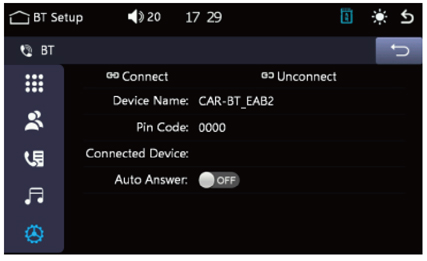
When the X-ride is not paired with a device, go to Phone>Settings>Bluetooth>Search for a device and find the Bluetooth name “CAR-BT-1AE” of the X-ride to connect. The phone will pop up a PIN code box, enter (PIN code settings on the settings interface) or confirm directly, and display “Phone device name” to indicate successful connection.
Once the phone has paired the X-ride, they will connect by auto when your phone has turned on Bluetooth and the X-ride is turned on.
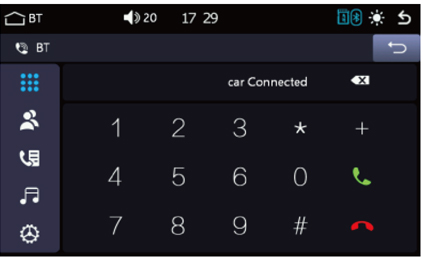
Type in the number in the interface to input the phone number. After entering the number click on the green phone to dial up and the red phone to end the call.

Enter the phonebook interface by clicking on the the “contacts” icon and then click on “sync contacts” icon and confirm the sync contact list request.
After the synchronization has completed you can click on “Seach for a contact” to find the contact you want to call.
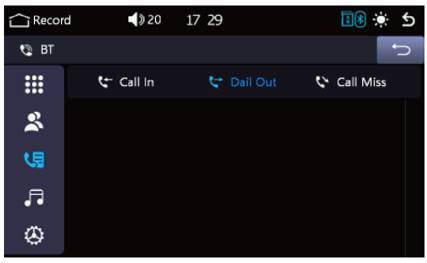
Call history interface can only synchronize the current calls and missed calls. On the call history interface you can dial out directly on the listed calls.
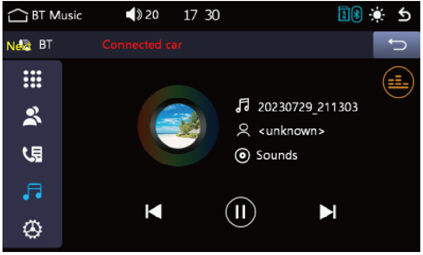
Bluetooth music playback interface, which can be connected to a bluetooth phone for playback/pause/up/down functions.
Use Bluetooth music function to play songs on your phone. For some music players on your phone, you need to first enter the music app from your phone and click play.
BT Ear (2- way bluetooth connection MODEL 2024)
If you previously have connected your Intercom or any other bluetooth headset with your phone , you have to unpair the devices before connecting to the X-ride.
Otherwise the Bluetooth device will be preferred and unable to connect to the X-ride. Once your Bluetooth device has been paired with the X-ride it will connect per auto when turned on and the X-ride is turned on.
Click on the “BT Ear” icon to enter the Bluetooth earphone interface. This is where you can pair up a Bluetooth Intercom or headset. After connecting the Bluetooth earphones, you can receive and operate phone and music functions.
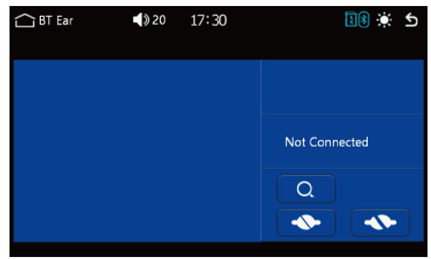
When Bluetooth earphones are not paired with a device: Enable Bluetooth earphones>Enable matching functions: Click on the host> search for devices> Find Bluetooth earphones to connect> Display “Earphone device name” to indicate successful connection.
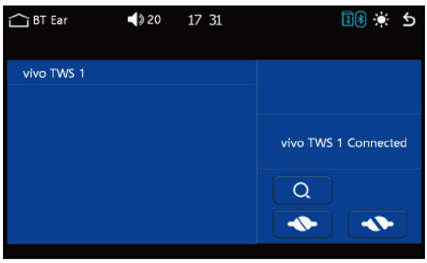
When Bluetooth earphones are paired with a device, the device name will be displayed and Bluetooth music and TF memorycard music can be transmitted.
BT Ear MODEL 2025
This menu buttom has been removed and simply connect Bluetooth directly from your phone to your speaker device/Intercom etc.
PASSWORD
Change the password
Go to the Main Menu and press “Setup”

Press “Change login password”

Enter your old Password (Standard 0000) Press “Enter”
Enter your new Password and Press “Enter”
You have now changed the Password that is needed to power up the X-ride.
Note: If you forget the Password the X-ride is locked, so write it down and keep it somewhere safe.

You can also disable the password menu when powering up your X-ride (model specific) If you can see the button “Power on display login interface” in the Basic setup menu, you can enable and disable the function by pressing this.
DVR / DASHCAM
Important notice
The screen will start recording on the front- and rear camera as soon as the power / the bike turns on, if an MicroSD card is inserted (has to be ordered separately). Remember to go to the Main menu (not the CarPlay or Android Auto) and go to DVR in the center and press record button to stop the recording, before you turn of your motorcycle. Otherwise the recording and memory card can crash.
TPMS
Inside the menu you will also find a TPMS feature.
We do not support this feature or deliver the required tire pressure sensors as they are dangerous to use on rubber vents. Rubber vents are not made to handle the extra weight from the sensors and can cause sudden puncture.
waste
Electrical and electronic equipment (EEE) contains materials, components and substances that may be dangerous and harmful to human health and to the environment when electrical and electronic waste equipment (WEEE) is not disposed of correctly

Products marked with the “crossed out bin” below are electrical and
electronic equipment. The crossed dustbin symbolizes that electrical and electronic waste equipment must not be disposed of together with unsorted household waste, but must be collected separately as electronic scrap.
warranty
2 years according to the provisions of the Purchase Act.
Support
Phone +45 93 94 36 96
Email: support@x-mcparts.com